Introduction
This guide will mainly be focused around Debian based Linux distributions, such as Linux Mint, Ubuntu, etc, but it should be fairly simple to adapt these instructions to work with your torrent client of choice. We will also be mainly using docker compose for ease of config
Installing Docker
Installing docker is best done by following the official instructions. These can be found at
https://docs.docker.com/engine/install/
Setting up torrent clients
There are a variety of torrent clients available, and we will be covering 3, qBittorrent, Transmission, Deluge
Setting up qBittorrent
qBittorrent Website
First, start by creating a directory where we will be storing our config for qBittorrent
mkdir qbittorrent-docker
Then open the directory and create a docker compose file
cd qbittorrent-docker
nano docker-compose.yml
We will be using the LinuxServer.io image, which can be found here
Paste the following text into the docker-compose.yml
---
services:
  qbittorrent:
    image: lscr.io/linuxserver/qbittorrent:latest
    container_name: qbittorrent
    environment:
      - PUID=1000
      - PGID=1000
      - TZ=Etc/UTC
    volumes:
      - ./config:/config
      - ./downloads:/downloads
    ports:
      - 8080:8080
      - 6881:6881
      - 6881:6881/udp
    restart: unless-stopped
Change the TZ according to this, and if you want to change the port for the webUI, change 8080:8080 to 6081:8080 or whatever you like.
In order to change the torrent port which will need to be port forwarded, change the 6881:6881 and 6881:6881/udp to 50000:6881 and 50000:6881/udp or however you like
Finally, change the path to downloads to however you like, or leave it default to make it download into qbittorrent-docker/downloads
Now use the following commands to run the docker container
docker compose pull
docker compose up
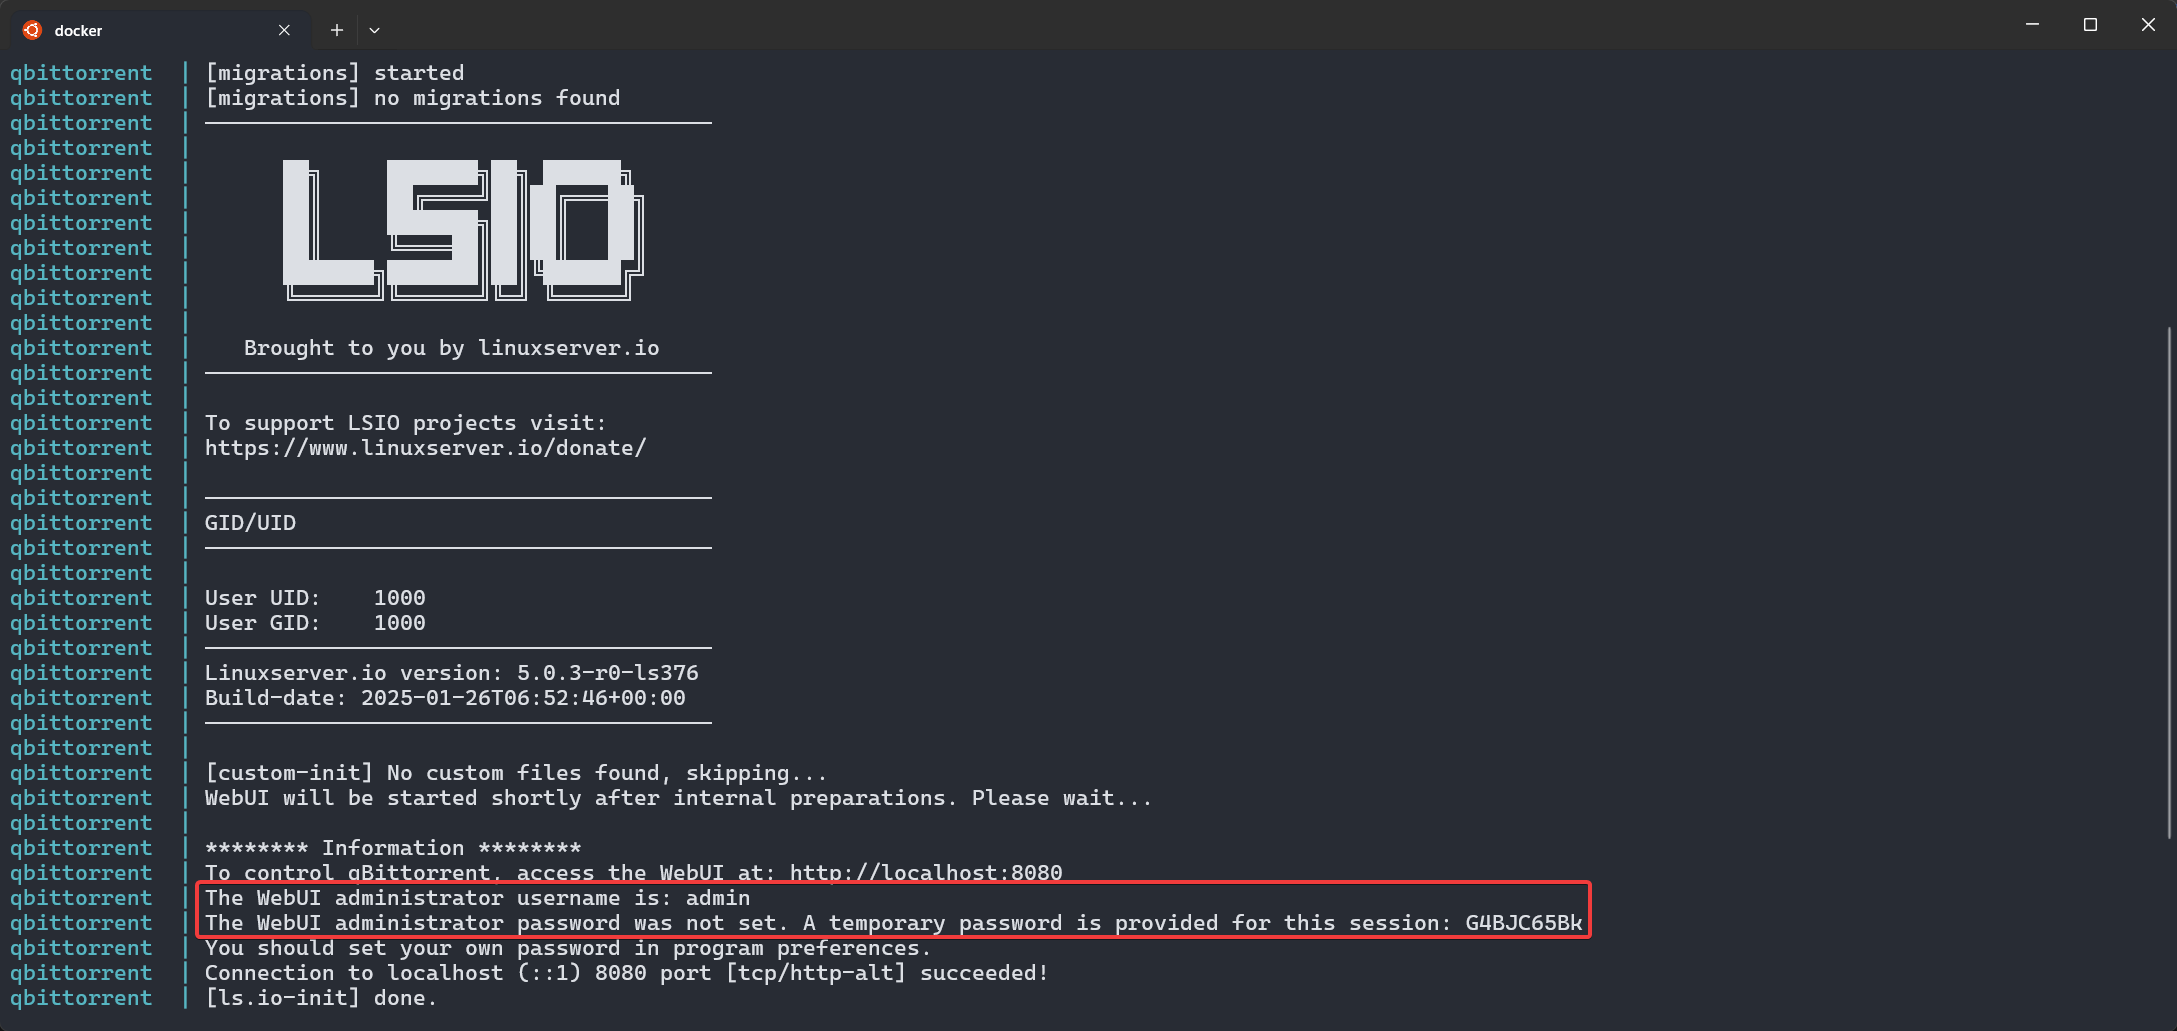
Pay attention to the output of the last command, it contains your login password that qBittorrent generated
If you get an error similar to docker compose: command not found, try docker-compose ... instead.
qBittorrent should now be available on http://127.0.0.1:8080 on a local machine and http://ip:8080 on a remote machine
If you cannot see the torrent client online, try checking your firewall or port forwarding settings
We are not setup just yet though, so just hold on for a little while. Login to the web interface of the torrent client and change the login password to something you have securely stored.
Now close the qBittorrent instance by pressing CTRL+C in the window where you ran docker compose up, and then run the following command
docker compose up -d
The -d flag tells docker compose to run our container in the background, so you don’t need to keep a terminal window open to keep the torrent client running
With that qBittorrent is installed! Continue with further configuration on the web interface or continue to the reverse proxy instructions to connect your torrent client to a domain name and use HTTPS to secure the connection, like https://qbittorrent.domain.tld
Setting up Deluge
Deluge Website
Installing Deluge will be almost identical to qBittorrent
First, start by creating a directory where we will be storing our config for Deluge
mkdir deluge-docker
Then open the directory and create a docker compose file
cd deluge-docker
nano docker-compose.yml
We will be using the LinuxServer.io image, which can be found here
Paste the following text into the docker-compose.yml
---
services:
  deluge:
    image: lscr.io/linuxserver/deluge:latest
    container_name: deluge
    environment:
      - PUID=1000
      - PGID=1000
      - TZ=Etc/UTC
      - DELUGE_LOGLEVEL=error #optional
    volumes:
      - ./config:/config
      - ./downloads:/downloads
    ports:
      - 8112:8112
      - 6881:6881
      - 6881:6881/udp
    restart: unless-stopped
Change the TZ according to this, and if you want to change the port for the webUI, change 8112:8112 to 6081:8112 or whatever you like.
In order to change the torrent port which will need to be port forwarded, change the 6881:6881 and 6881:6881/udp to 50000:6881 and 50000:6881/udp or however you like
Finally, change the path to downloads to however you like, or leave it default to make it download into deluge-docker/downloads
Now use the following commands to run the docker container
docker compose pull
docker compose up -d
If you get an error similar to docker compose: command not found, try docker-compose ... instead.
Deluge should now be available on http://127.0.0.1:8112 on a local machine and http://ip:8112 on a remote machine
If you cannot see the torrent client online, try checking your firewall or port forwarding settings
The default password is deluge
Setting up Transmission
Transmission Website
Installing Transmission will be almost identical to qBittorrent and Deluge, since we are using docker
First, start by creating a directory where we will be storing our config for Transmission
mkdir transmission-docker
Then open the directory and create a docker compose file
cd transmission-docker
nano docker-compose.yml
We will be using the LinuxServer.io image, which can be found here
Paste the following text into the docker-compose.yml
---
services:
  transmission:
    image: lscr.io/linuxserver/transmission:latest
    container_name: transmission
    environment:
      - PUID=1000
      - PGID=1000
      - TZ=Etc/UTC
      - USER= #optional
      - PASS= #optional
    volumes:
      - ./config:/config
      - ./downloads:/downloads #optional
    ports:
      - 9091:9091
      - 51413:51413
      - 51413:51413/udp
    restart: unless-stopped
Change the TZ according to this, and if you want to change the port for the webUI, change 9091:9091 to 6081:9091 or whatever you like.
You will need to change the USER and PASS values to your preffered login credentials.
In order to change the torrent port which will need to be port forwarded, change the 51413:51413 and 51413:51413/udp to 50000:51413 and 50000:51413/udp or however you like
Finally, change the path to downloads to however you like, or leave it default to make it download into transmission-docker/downloads
Now use the following commands to run the docker container
docker compose pull
docker compose up -d
If you get an error similar to docker compose: command not found, try docker-compose ... instead.
Transmission should now be available on http://127.0.0.1:9091 on a local machine and http://ip:9091 on a remote machine
If you cannot see the torrent client online, try checking your firewall or port forwarding settings
Reverse Proxy
Coming soon :)